What This Drawing Shows
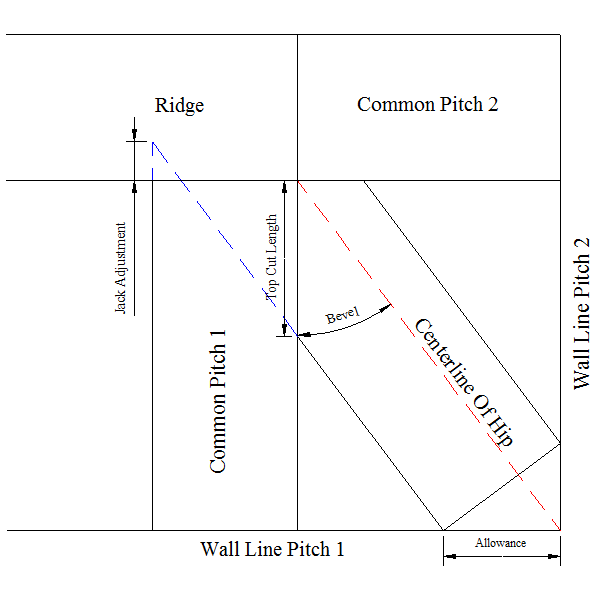
This drawing is designed to show the intersection of the hip and common rafters at the ridge and the placement of the hip at the wall line.
It is assumed that the throats, or the vertical height of the rafter where it crosses the wall, are the same for all rafters.
Allowance:
The
Allowance displays the distance along the wall line from the corner of the wall intersection to where the hip rafter crosses the exterior of the wall.
Top Cut Length:
The
Top Cut Length is the finished length of the bevel cut on the top of the hip rafter where it contacts the common rafter. This is useful when one bevel is to great to accurately cut.
The smaller bevel can be cut first then, using the top cut length, the steeper bevel can be marked and cut from the end of the board.
Bevel:
The
Bevel is the saw cut bevel for the hip rafter where it contacts the common rafter.
Note: One thing to remember is that on a circular saw the degree of bevel is how many degrees from 90 degrees.
Jack Adjustment:
The
Jack Adjustment is the length which needs to be added to the common rafter length before calculating the hip jack rafters.
The dotted blue line is drawn to show where the actual intersection of the hip rafter and common rafter would be.
This is done to demonstrate the need to adjust the length of the common rafter when it is used to calculate the length of hip jack rafters.
Hip Pitch:
The
Hip Pitch is the pitch of the hip in degrees.
Hip Height Adjustment:
The
Hip Height Adjustment shows how much the throat of hip must be lowered when the hip is cut with a birds mouth which butts into the outside corner of the wall intersection.
Lowering the hip allows the top corners of the hip to be at the proper height where they cross the exterior of the wall.